Introduction
This Tutorial was written for EfL 4.0
With Evidence for Learning (EfL) version 4.0 we have introduced a very useful and powerful synchronisation engine that sends the evidence data captured on your devices to the learner’s Cloud profile. It will also keep your System Data (learners, groups, frameworks, tags, date ranges and comment templates) up-to-date across all your devices , and we have made it easier to save your PDF reports (document and grids) to the learner’s Cloud profile too.
Pair your devices
In order for the synchronisation engine to know how to deal with the data being captured on your devices, each device needs to be configured so that all data on the device is ‘known’ to your Cloud. The device’s data needs pairing to your Cloud data. We call this process ‘Pair your device‘.
All your devices need to be paired, so the cloud knows all of the System Data that all of your devices work with. An unpaired device will not synchronise with the cloud or make reports dependent on cloud data.
Before you start
During the pairing process you will be guided through each category of System Data. If there is any System Data that your Cloud doesn’t ‘know’, you’ll have the choice of:
- deleting that data from the device;
- adding it as new data to your Cloud; or,
- in some cases, linking it to existing System Data already in your Cloud.
Tags, frameworks and learners cannot be deleted if they are linked to evidence already on the device, so if you don’t want any particular tags, frameworks or learners uploaded from your device to your Cloud, you’ll need to clear out the evidence associated with them before deleting tags, frameworks or learners from the device.
When you’ve done that you are ready to run the pairing process.
Recommended Tutorials…
We recommend that you watch the following videos which explain why and how “pairing” works and show you how to pair the devices in your setting, school or organisation in different scenarios (e.g. setting up the Cloud for the first time, pairing other devices to the Cloud, etc..)
Part 1: Setting up your Cloud and pairing your devices (Pair this Device)
This video shows you how to pair a device with the Cloud, when you have already added System Data to the device and there is NO existing Cloud System Data. E.g. If your setting, school or organisation is a new Cloud Subscriber, and you are setting up the Cloud for the first time.
[vc_button title=”Pair this Device Part 1″ target=”_self” color=”red” size=”large” align=”left” href=”https://www.youtube.com/watch?v=luf6gv2vaYk” el_class=”efl_leftmargin10″]
Part 2: Updating your Cloud and pairing your devices (Pair this Device)
This video shows you how to pair a device with the Cloud, when you have already added System Data to the device and there IS ALREADY existing Cloud System Data. E.g if you have already paired 1 or more devices to the Cloud, or you have updated the app from a earlier version and already have an existing Cloud Subscription with System Data in your Cloud.
[vc_button title=”Pair this Device Part 2″ target=”_self” color=”red” size=”large” align=”left” href=”https://www.youtube.com/watch?v=N410rpb3Jrk” el_class=”efl_leftmargin10″]
Part 3: Pairing your devices (Pair this Device)
This video shows you how to pair a device with the Cloud, when you have NOT added any System Data to the device and there IS ALREADY existing Cloud System Data. E.g if you have just downloaded the app, activated a (Cloud) subscription on the device, and not yet added any System Data to the device.
[vc_button title=”Pair this Device Part 3″ target=”_self” color=”red” size=”large” align=”left” href=”https://www.youtube.com/watch?v=qVxfQObk4sg” el_class=”efl_leftmargin10″]
The Pairing process
Open up the EfL app, we’ll assume the device has been activated for your subscription, and tap the settings menu in the top left at the main home screen to bring up the Device Admin menu, then choose Cloud Admin in the top right, enter the Cloud Admin Password and tap “Pair this device”.
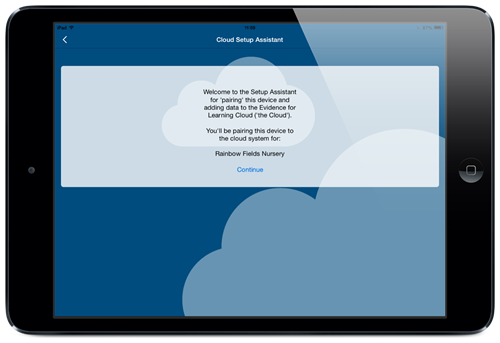
You’ll be presented with an introduction message from the Cloud Setup Assistant.
Step 1
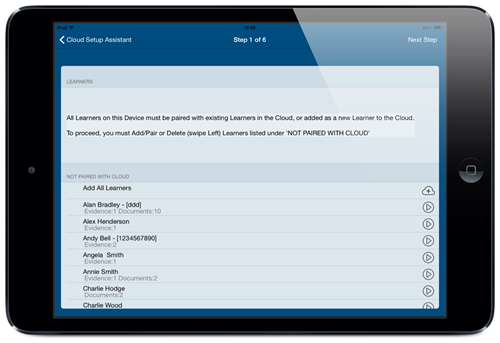
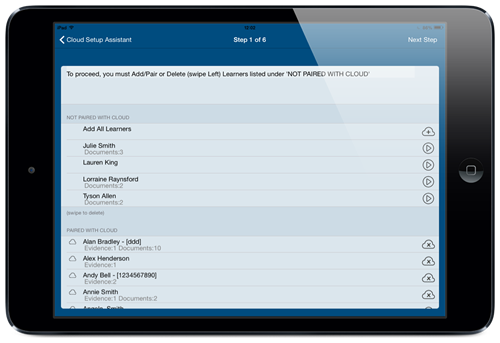
The first step is to pair the learner data on this device. If you are pairing a device with no learners on it you can skip the next few paragraphs, but if you have learners on the device you will see they appear in the list of learners ‘NOT PAIRED WITH CLOUD’.
If you have no learners in your Cloud and you want to add all the learners from this device to your Cloud you can tap the Add All Learners button. This will create a new learner for each learner on the device so be sure to only tap it if you are sure none of the learners in the list already exist in your Cloud. You could link some learners to existing learners in your Cloud first then tap Add All Learners to add the rest to your Cloud.
For each learner you can swipe to delete if you don’t want them in the system – (remember learners with evidence can’t be deleted). You can tap the arrow icon on the right hand side to bring up the next screen…
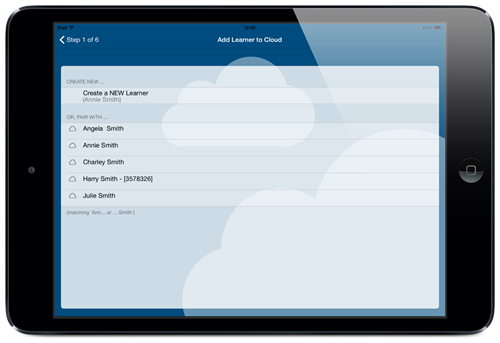
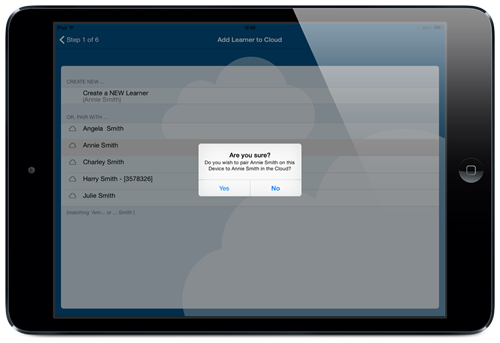
This screen will give you the option of ‘Create a New Learner’ (choose this if you are sure this is a new learner not already in your Cloud) or pair it with a similar existing learner found in your Cloud. It’ll find similar first names and last names, in this case it’s showing me a sibling for Annie and a few other ‘Smiths’, I want to pair Annie Smith on my device with Annie Smith already in the Cloud.
If at any time you pair with the wrong learner you can choose to cancel the pairing by tapping the cloud icon with the cross on the right hand side of the learner in the list ‘PAIRED WITH CLOUD’.
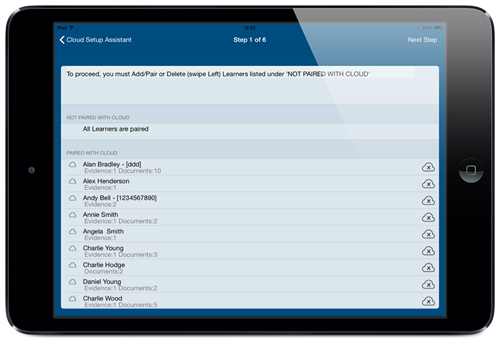
Repeat this process for each learner in the device until you see the message ‘All Learners are paired’…
The objective of Step 1 is to move all the learners to the ‘PAIRED WITH CLOUD’ list by creating a new Cloud record, pairing with an existing Cloud record or by deleting the learner from the list ‘NOT PAIRED WITH CLOUD’. When you have completed this step you can tap Next Step in the top right.
Step 2
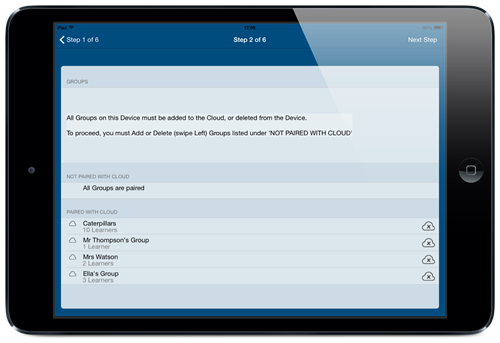
Ok, this step is slightly more straight forward than step 1. With groups we can’t link to existing groups. You can add a group to your Cloud by tapping the add to cloud icon on the right hand side of the group this will move it from ‘NOT PAIRED WITH CLOUD’ to ‘PAIRED WITH CLOUD’. If you don’t want to add a group to your Cloud then swipe from right to left over the group to delete it.
When you see the ‘All Groups are paired’ message you are ready to add the Next Step.
Step 3
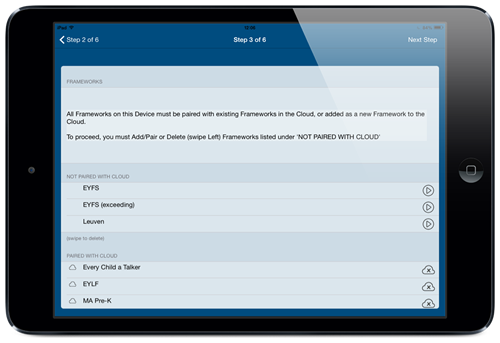
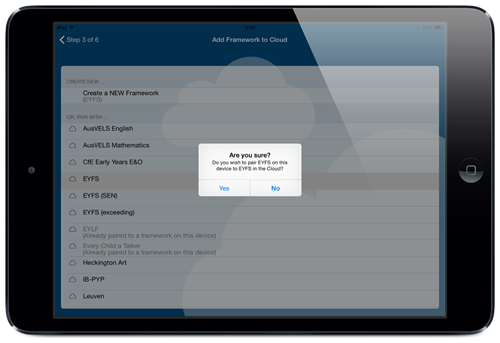
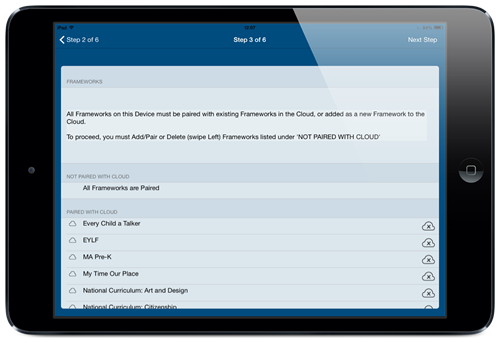
Step 3 pairs your frameworks. You have the same choices as pairing learners in step 1. You can delete the framework (subject to there being no evidence linked to the framework), you can pair the framework to an existing framework in your Cloud or you can add the framework to your Cloud as a new framework.
In this case I want to pair EYFS to the EYFS framework already in my Cloud, I tap the arrow icon on the right hand side of EYFS to bring up the screen below and choose EYFS from the ‘OR, PAIR WITH…’ list…
As before repeat this process of deleting, creating or pairing with existing, for each framework in the ‘NOT PAIRED WITH CLOUD’ list until you see the ‘All Frameworks are Paired’ message below.
Then tap Next Step.
Step 4
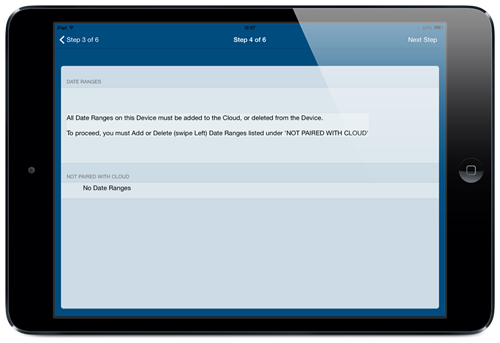
Step 4 pairs your Date Ranges. This is a straight forward step as per groups in step 2. So you will only have the options of swiping to delete Date Ranges from the device or adding Date Ranges from the device to your Cloud.
On your first device being paired, you will probably add Date Ranges to the cloud. However, you will may have deleted Date Ranges from subsequent devices as you won’t need to add duplicates to your Cloud. Once the device is paired you’ll be able to add any Date Ranges to the device from your Cloud.
If you want to add Date Ranges to the cloud go ahead and tap the plus button next to each Date Range. in this case I’ve already deleted them from the device…
So I’ll just tap Next Step.
Step 5
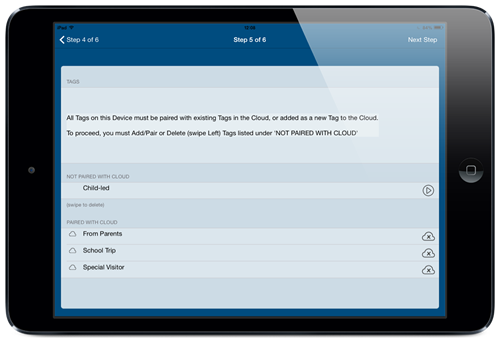
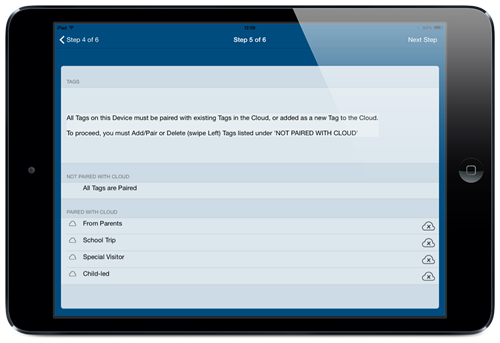
Step 5 pairs your tags, this has the same options as learners and frameworks. You can delete them from the device with a swipe, add new tags to your Cloud or pair the tag with existing tags in your Cloud.
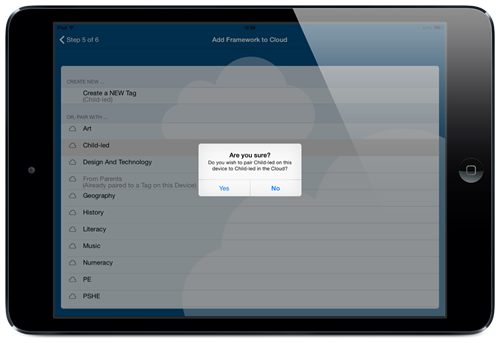
In the screen above I have already paired the 3 tags ‘Special Visitor’, ‘School Trip’ and ‘From Parents’. I now need to tap ‘Child-led’, so I tap the triangle icon on the right hand side of ‘Child-led’. I’m given the choice of creating a new tag called ‘Child-led’ but in this case I can see there is already a tag called ‘Child-led’ I want to pair with. I tap it then confirm the pairing…
As with he other steps our objective is to empty the ‘NOT PAIRED WITH CLOUD’ list.
When we see the ‘All Tags are paired’ message we can tap Next Step – (the last step).
Step 6
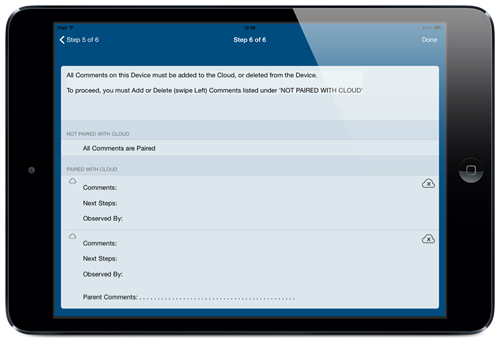
Step 6 pairs your Comment Templates. Like the groups and date ranges you can only delete the Comment Template from the device or add it to your Cloud. Similar to Date Ranges you might find that the first device you pair you’ll pair the Comment Templates but later devices will just use existing Comment Templates in your Cloud.
In the screen above I’ve paired the 2 Comment Templates shown, but I won’t pair them on the next devices I choose to pair as I know they will already be in the Cloud.
As per usual when I see the message ‘All Comments are paired’ I can tap the Done button.
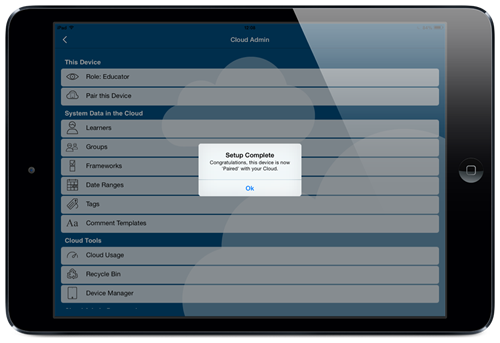
Congratulations you have paired the device.
What Now?
Pairing the device means your Cloud knows all the learners, groups, frameworks, date ranges, tags and comment templates stored in the device, more importantly it will know where to sync any evidence you capture for a learner, which frameworks to track, who you want to build a learning journey or grid for. This device will now synchronise with your Cloud. If you have evidence on the device it will begin synchronising the evidence to the learners’ Cloud Profiles.
You’ll need to repeat this process for each device using your Cloud Subscription to fully enable the synchronise engine across the whole system.
Need Help?
If you have any problems please don’t hesitate to get in touch via our Contact form.
[vc_button title=”Contact Us” target=”_self” color=”blue” size=”large” align=”left” href=”contact-us” el_class=”efl_leftmargin10″]

